
|
|
|
|
#1 |
|
Участник
|
powerobjects: Capturing Signatures in Dynamics 365
Источник: https://www.powerobjects.com/2018/04...-dynamics-365/
==============  In our increasingly digital world it is important for businesses to have the ability to capture signatures without relying on printed documents. To make the signature process a breeze, Dynamics 365 allows for signatures to be captured on the spot with the Dynamics 365 for Phones and Tablets App. Today’s blog will teach you how to enable signatures in Dynamics 365 in addition to capturing signatures in the Dynamics 365 for Phones and Tablets app. Part 1: Creating a Signature Field and Capturing Signatures Creating a Signature Fields First things first, we need to create a “Multiple Lines of Text” field. Multiple Lines of Text is the only type of field that allows for capturing signatures, and the number of characters should be modified to hold 15,000 characters. Without this high number of characters, the signature block will likely exceed the maximum character length of the field. In this example, we have created a Multiple Lines of Text field named ‘Client Signature’ in the Contact entity and will be placing it on the Main Contact form as well as the Main Contact for Interactive Experience form. The Main Contact form refers to the main form users will see on the Web interface, while the Main Contact for Interactive Experience form refers to the form users will use on the Dynamics 365 for Phones and Tablets app. A word of advice, make sure you have written down or remember the Schema Name of the field you have just created, in this case “po_clientsignature”, as this will be important for displaying the signature in the web interface on Part 2 of this blog. 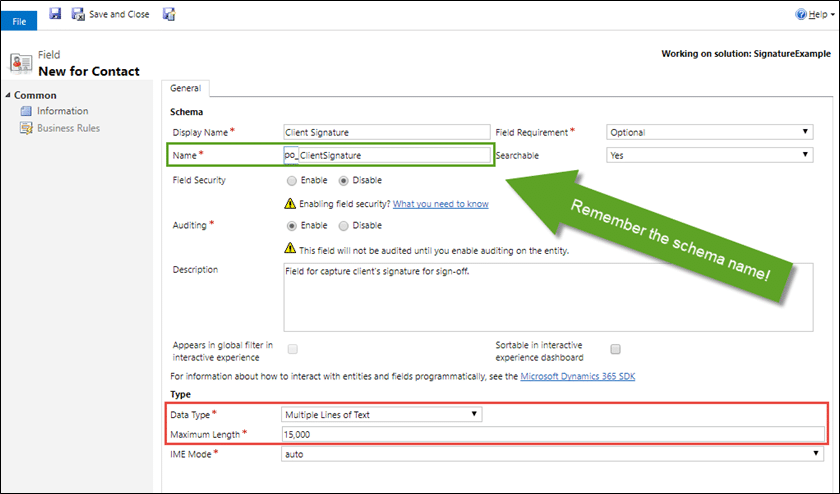 Navigate to both form editors where you want the signature field to be placed and drop the field in the desired location on both forms. Signature blocks usually play nicely with a wider section if possible. 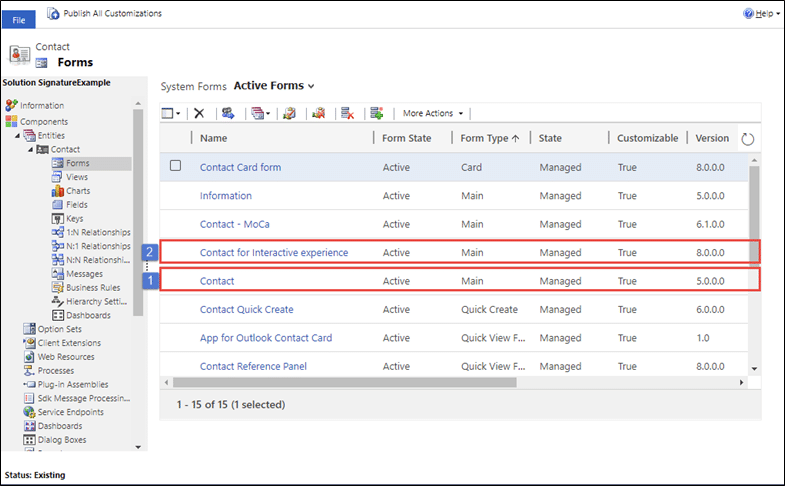 Once the field is placed in the desired location, we will want to enable Pen Control for the signature field located on the Main Contact for Interactive Experience form (or other mobile form you may be using). To do this, first highlight the signature field and click on ‘Change Properties’ in the Home section of the ribbon, then click on the Controls tab on the far right of the Field Properties popup. Pen Control should be an available option to select and add click Add Control. 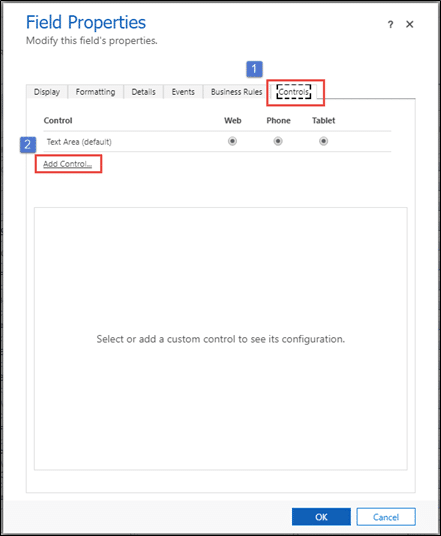 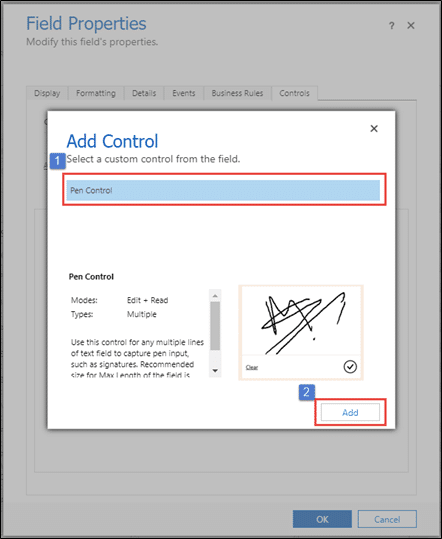 Once added, enable Pen Control for Web, Phone, and Tablet by clicking on the radio buttons located next to Pen Control, and don’t forget to save and publish your changes.  At this point, it should be noted that capturing signatures can only be done through the mobile interfaces including Phone and Tablet, but not the Web interface. When no signature has been captured, the Web interface will show a blank text field that could be typed in (which users should not do), but when a previously captured signature exists, the web interface will display the signature using base64 encoded format. In other words, the field on the Web interface will look like a long set of random characters but is a format that JavaScript can easily read and display. This means the Web interface can be customized to display the signature if desired. This process will be addressed in step 2 of this blog. Capturing Signatures with The Dynamics 365 for Phones and Tablets App Head on over to your phone or tablet, and if you haven’t already, download the Dynamics 365 for Phones and Tablets App. If this is your first time in the app you will have to configure it to connect to your Dynamics 365 environment first, then click on the appropriate hub. 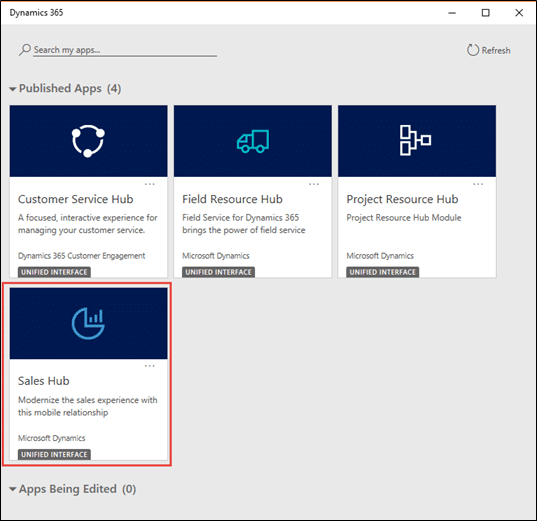 When you have properly accessed the Dynamics 365 mobile environment, navigate to the entity on which your signature field is located. In this example, our signature field is located on the Contacts entity. Create a new contact or select an existing contact and scroll down to the signature block where you should see a signature line with the field label on the left.  Ready. Get Set. Sign! 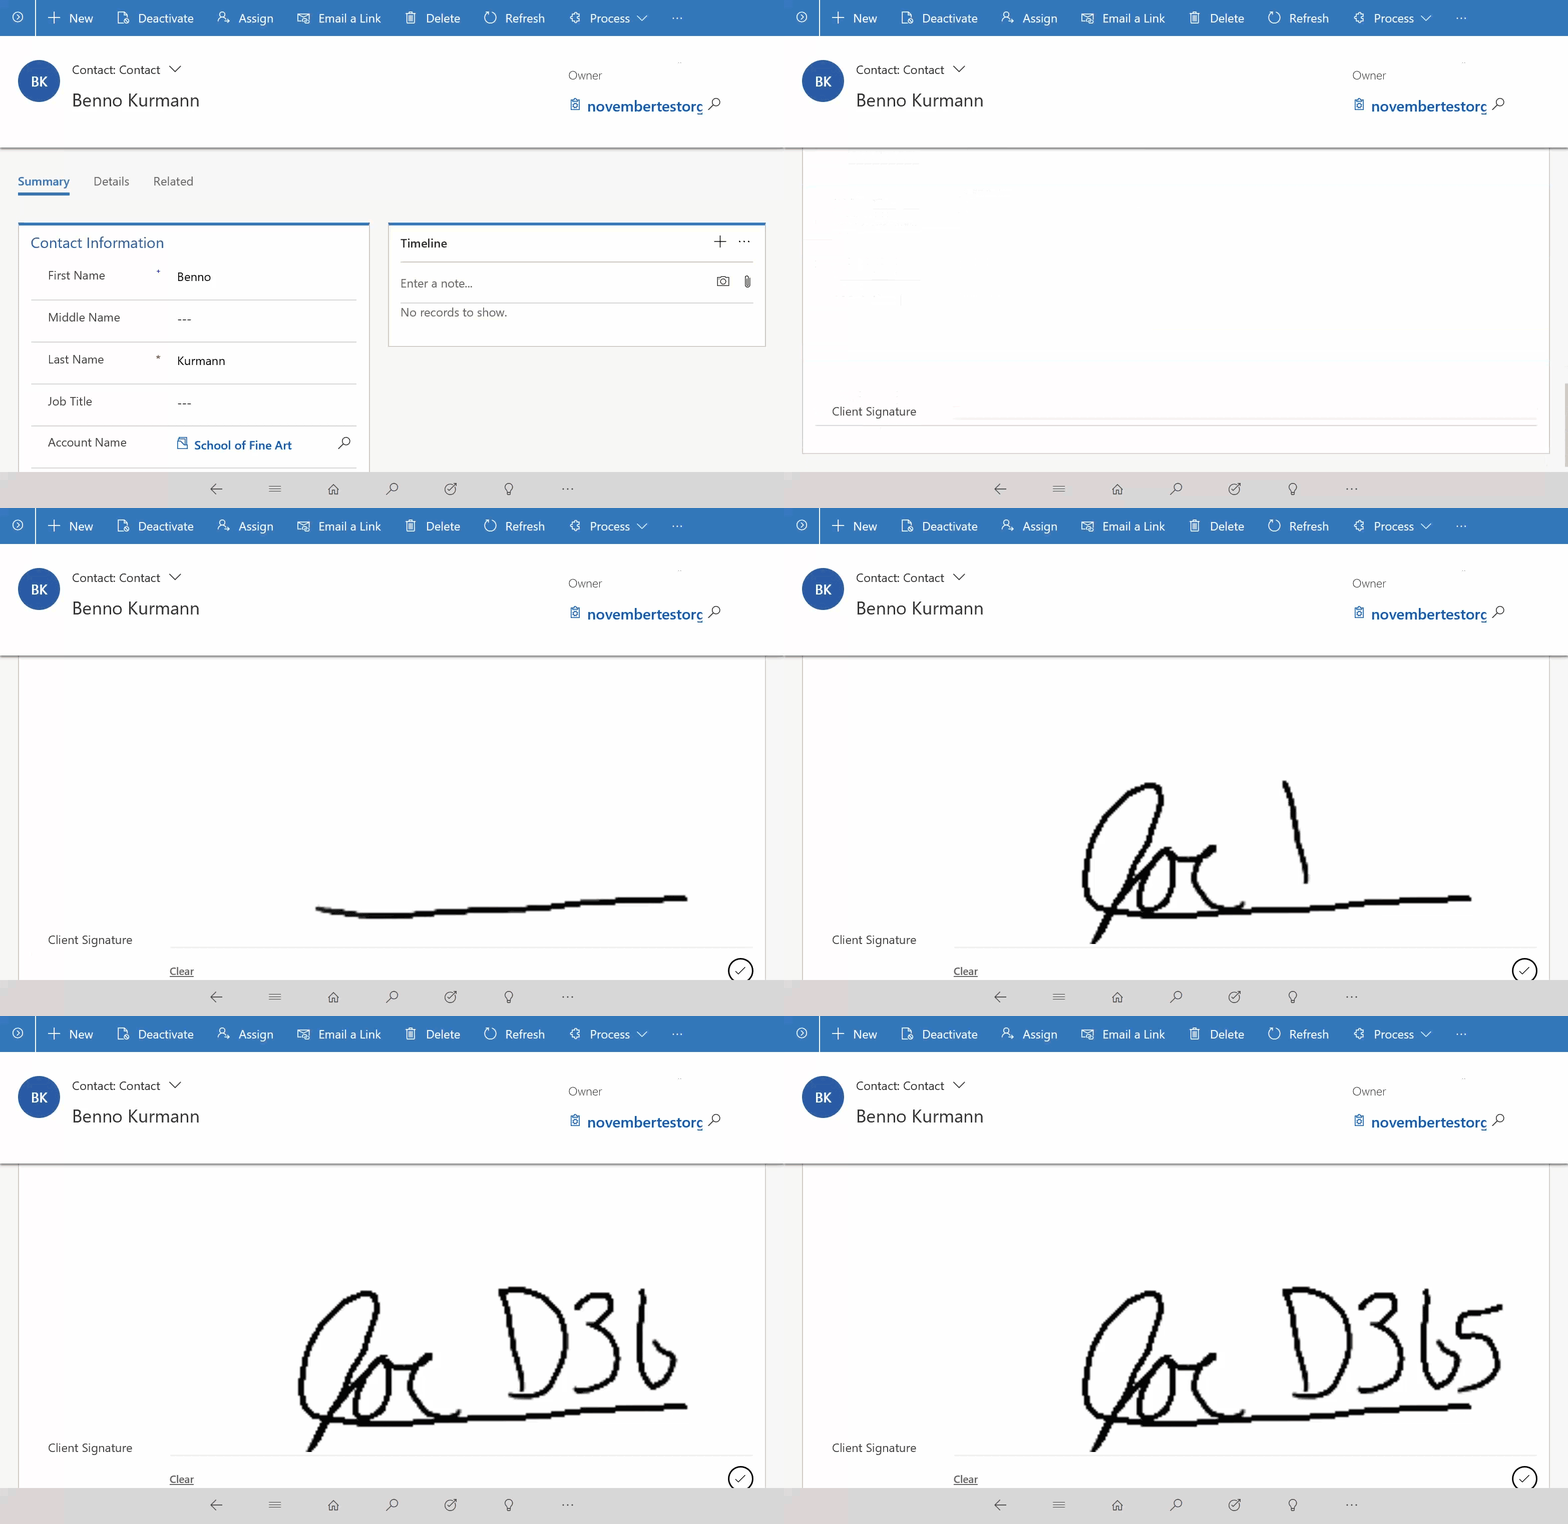 Deleting an Existing Signature We aren’t quite done just yet. By now you have likely noticed the clear button and circle checkmark icons that appear underneath the signature line after signing. The clear button will do just that, clear the signature to start fresh. The checkmark icon will save the signature. Once the signature is saved, it cannot be deleted or edited on the mobile device. In the rare occurrence that a signature needs to be removed (usually you should never delete signatures), this must be done by using the Web interface to delete the text string displayed in base64 format. Part 2: Displaying the Signature Image on the Web Interface Part 2 of this blog involves a slightly more technical component by utilizing a web resource to show the captured signature on the Web interface and involves HTML and JavaScript. If you have some understanding of HTML and JavaScript, this should be a breeze! HTML and JavaScript The first step in displaying the signature is to create an HTML file that uses JavaScript to take the base64 text string in the signature block and apply it to an image tag in the HTML. Go ahead and open up a text editor. Below you will see the HTML in both text and image format so you can copy and paste the HTML, but still see what it looks like inside the editor with some visual aids. --------------------------------- Display Client Signature <img id="displayClientSignature"/> ---------------------------------  We won’t go over all the details of what the HTML and JavaScript are doing, but there are a couple parts that may need to be adjusted to fit your specific setup. First, on line 13 with the yellow line, the variable named ‘clientSignature’ is being set to the value of the signature block field we created in Part 1 of the blog. Remember when it was mentioned you should write down or remember the field’s Schema Name? This is where we use it again and in our case, is ‘po_clientsignature’. Second, notice lines 9 and 14 that are highlighted by the purple accents. All that needs to be said here is that the HTML tag ID should match the getElementByID script, in this case named ‘displayClientSignature’. Make sure to save the file as an HTML filetype where it will be used as a web resource in the next step. My HTML file is saved as ‘customerSignatureDisplay.html’. Web Resource To create a web resource, navigate to the form where the signature block field will be display on the Web interface and click the Insert tab at the top of the page. In the Web Resource Properties popup, click on the search icon for the field titled web resource, then click on Look up More Records. 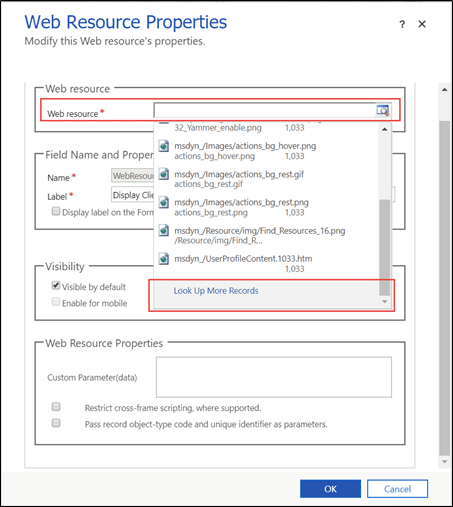 On the ‘Lookup Record’ popup click the New button found in the bottom left. 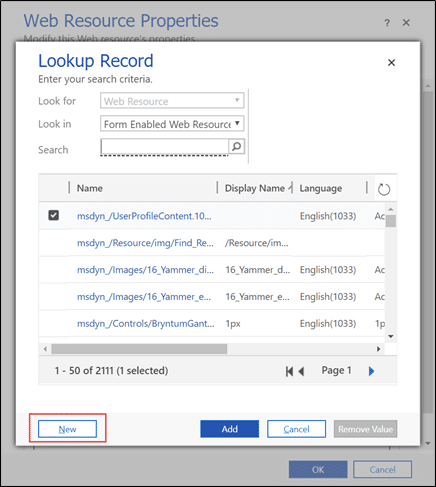 You should now be able to create the Web Resource by naming it, giving the web resource a description (always good practice), and selecting HTML as the Web Resource ‘Type’.  Click on the file selector and select the HTML file you just created in the previous step. Make sure to Save and Publish before closing the web resource window and add the resource in the ‘Lookup Record’ window that should have still been available in the background. Finally, we need to finish the Web Resources Properties window. Do this by filling in the required fields inside the Web Resource Properties window in the General tab, then navigate to the Formatting tab to adjust the size of the web resource window on the form.  We have selected nine rows for the ‘Number of Rows’ field and checked the ‘Automatically Expand to Use Available Space’ checkbox. Finally, make sure you select NEVER on the ‘Scrolling’ field so the user will always see the entire signature block. 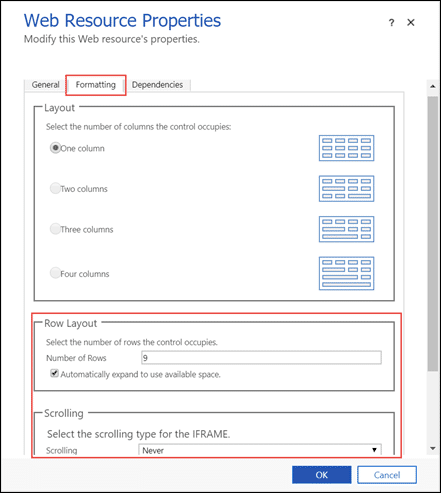 The formatting settings you end up using will vary based on your form’s layout and setup and you might need to play around a bit to get it right. After everything looks good, click the OK button. At this point the web resource is ready to rock. Just place it where you want on the form, save, and publish the form.  Check Your Work Using the Web interface of your Dynamics 365 environment, head over to the record that you signed in the signature field in part 1. Voila! You should see an identical signature displayed just like the signature taken on the mobile device! Keep in mind this signature cannot be captured inside the Web interface nor can it be manipulated via the image. It should also be mentioned that there is little reason to have the actual signature field on the Web interface form and the only reason it has been display here is for demonstration purposes. Normally this field would be hidden as to make sure signatures were not accidentally deleted by Dynamics 365 users. 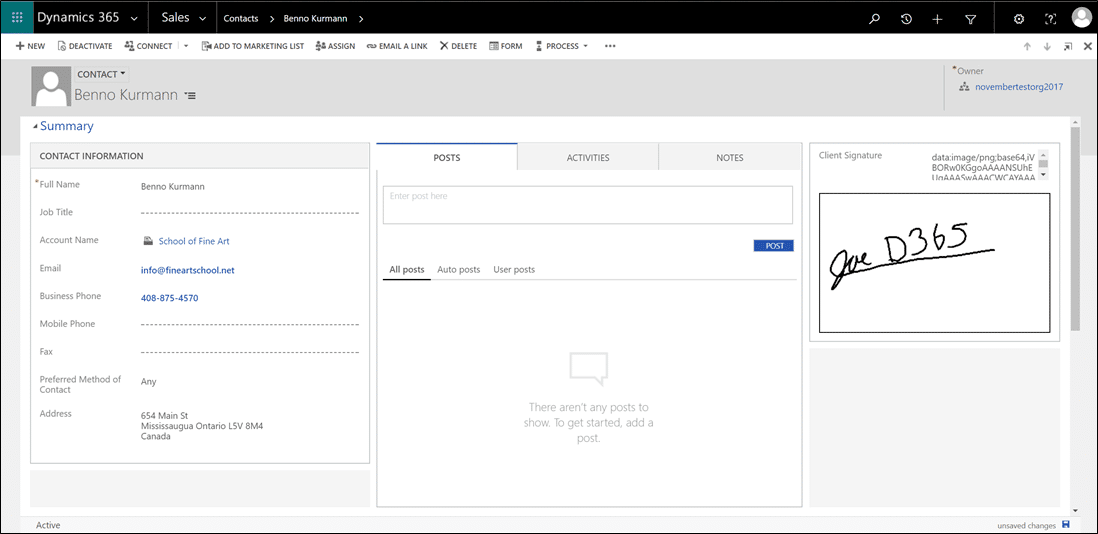 There you have it, digital signatures right inside Dynamics 365! Having been initially released on CRM 2016, Dynamics 365 online truly makes the signature feature shine where your data is accessible anywhere, at any time. Well that does it. Signing off for tonight here at PowerObjects, this is Joe D365. And remember, for more Dynamics 365 tips and tricks, be sure to keep checking our blog! Happy Dynamics 365’ing! Источник: https://www.powerobjects.com/2018/04...-dynamics-365/
__________________
Расскажите о новых и интересных блогах по Microsoft Dynamics, напишите личное сообщение администратору. |
|
|
|
|
|