Источник:
http://www.dynamicsaxtraining.com/pr...ion-life-cycle
==============
Introduction
Hi! In this training lesson, we will learn the main production process steps and their realization in Microsoft Dynamics AX.
I have decided to create a new Universal Recorder BOM item that will consist of items from the standard demo data and with a simple route. We will learn the most complex flow of production process that will include the warehouse management (the
item arrival and
shipment flows) and the job management.
Prerequisite Setup
In this topic, we will create and check all data that is required to complete a production process. We will do the following:
- Create a new Universal Recorder BOM item.
- Create a new Universal Recorder BOM. BOM will consist of components 1601 and 1602. Check the warehouse management parameters.
- Create a simple Universal Recorder route. Check the job management parameters.
- Purchase BOM components (1601 and 1602) to make them on-hand in stock.
Creating a New BOM Item
We have already discussed what a BOM item is and how it can be created in
this training lesson. Shortly, a BOM item is a regular item whose
Item type field contains the
BOM value.
Let’s create a new Universal Recorder BOM item:
- Go to Inventory management > Common Forms > Item details. The Item form opens.
- Create a new line with the following parameters:
- Item number = 0000
- Item name = Universal Recorder
- Item group = Packaging
- Item type = BOM
- Inventory model group = FIFO
- Dimension group = N-W
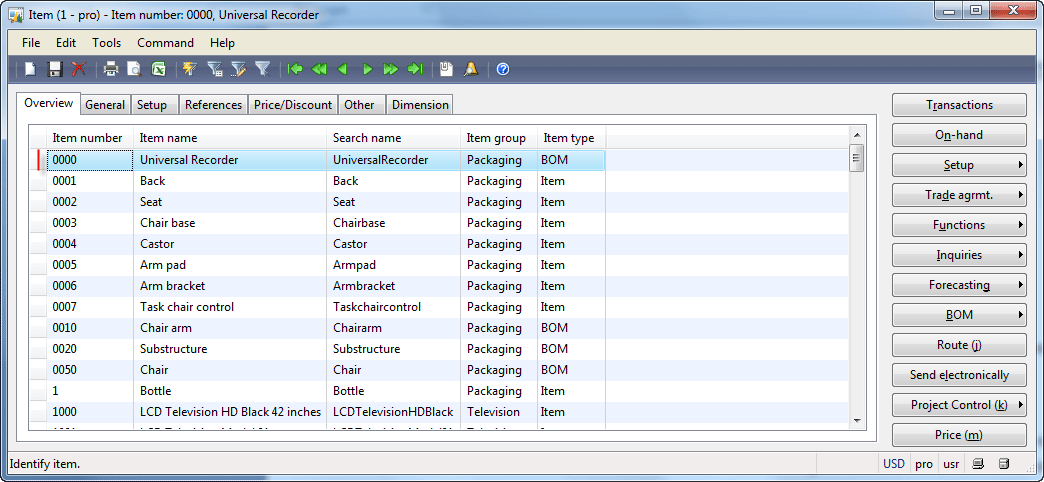
Item form
To understand what the Item group, Inventory model group, and Dimension group parameters are used for, read the “Item setup” training lessons from the
Trade and Logistics training.
Creating a BOM
A BOM is a receipt of a BOM item (like a cake receipt containing a list of ingredients). In the
Bills of Material training lesson, we have already discussed how a BOM is created and set up. In our example, the “receipt” of the Universal Recorder BOM item will include items 1601 and 1602. This is not logical as Universal Recorder contains a lot of different elements (a microchip, a decoder, a sound-recorder head, etc.). But to understand the production process, it does not matter whether a BOM contains all required components. We will assume that only items 1601 and 1602 are required to assembly the Universal Recorder. These items are taken from the standard demo data and already contain the Warehouse management setup.
Let’s create the new Universal Recorder BOM:
- Go to Inventory management > Common Forms > Bills of Materials. The BOM form opens.
- In the header area, create a new line with the following values:
- Name = Universal Recorder BOM
- Site = 2
- Click the Lines button. The BOM line form opens.
- Create a new line with the following values:
- Item number = 1601
- Warehouse = 22
- Quantity = 1
- Create another line with the following values:
- Item number = 1602
- Warehouse = 22
- Quantity = 1
- The BOM line form will have the following view:
 BOM line form
- Close the BOM line form.
- In the Versions area, create a new line with the following values (assign a BOM item):
- Item number = 0000 (Universal Recorder)
- In the Versions area, click the Approve button. Select employee 7210, select the Approve Bill of materials check box in the Approve version form, and then click OK.
- In the Versions area, click the Activation button.
- The BOMform will have the following view:
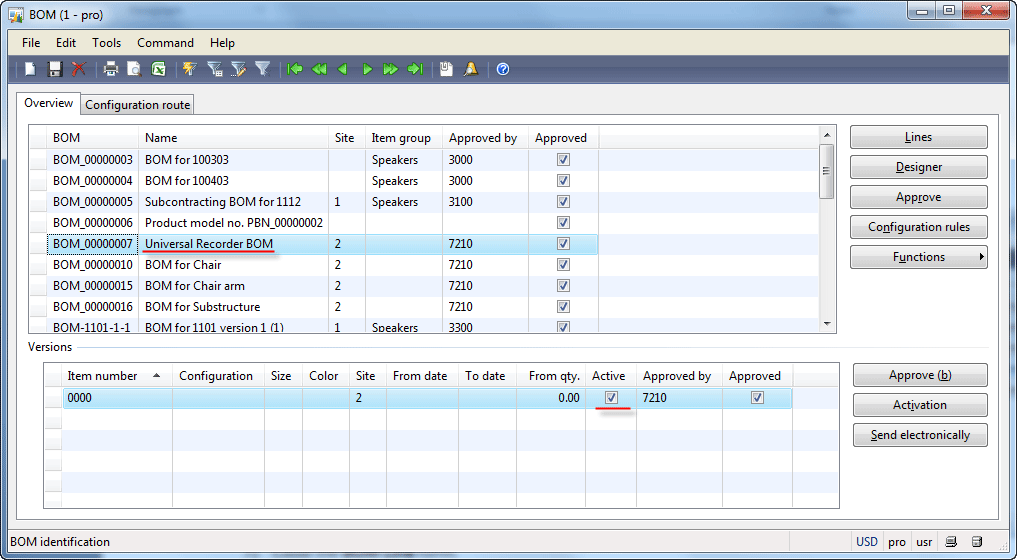 BOM form
Let’s analyze the BOM components: items 1601 and 1602. These items must have the setup that uses the Warehouse management features. Note that we will analyze only item 1601, because item 1602 has the same parameters.
First of all, item 1601 must have the Site, Warehouse, Location, and Pallet dimensions active:
- Go to Inventory management > Common Forms > Item details. The Item form opens.
- Find item 1601 and go to the General tab. The item uses the N-WLP dimension group.
- Right-click the Dimension group field and select the Go to the Main Table Form option. The Inventory dimensions form opens. Make sure that the Site, Warehouse, Location, and Pallet Id dimensions are active.
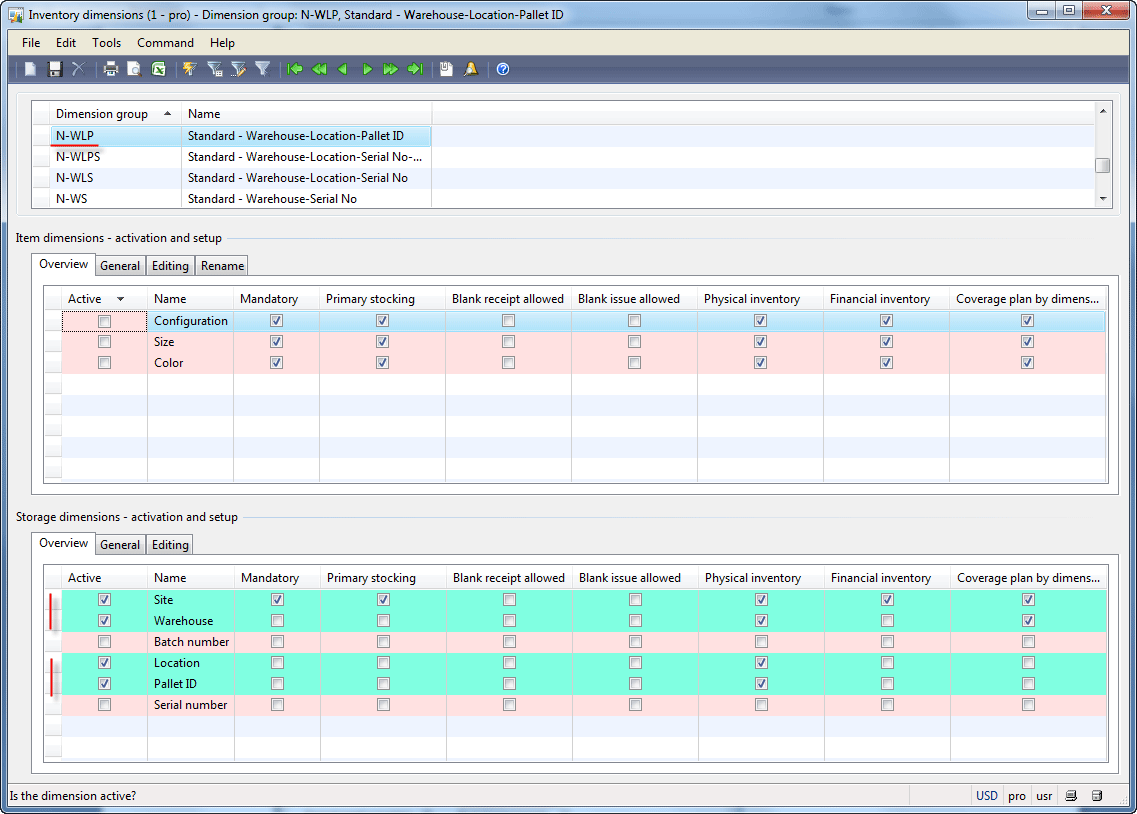 Inventory dimensions form
Item 1601 must be set up so that the registration and picking steps are mandatory. The Registration step ensures that a pallet with items is placed in a certain warehouse location. The Picking step ensures that the item is picked from the warehouse location. If, for example, the registration step is not mandatory, then the item can be received in a warehouse when an Invoice is posted without any previous steps.
- Go to Inventory management > Common Forms > Item details. The Item form opens.
- Find item 1601 and go to the General tab. The item uses the FRP_PICK inventory model group.
- Right-click the Inventory model group field and select the Go to the Main Table Form option. The Inventory model groups form opens. Go to the Setup tab and make sure that the Registration requirements, Picking requirements, and Consolidated picking methodcheck boxes are selected.
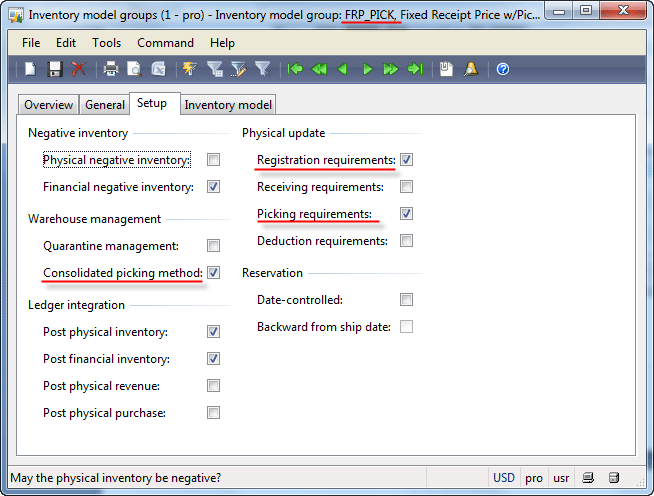 Inventory model groups form
The pallet type for item 1601 must be set up so that to receive, store, and issue items and the quantity of an item that can be loaded to the pallet must be specified:
- Go to Inventory management > Common Forms > Item details. The Item form opens.
- Find item 1601 and go to the Setup tab. Make sure that the Pallet type and Pallet quantity fields are populated.
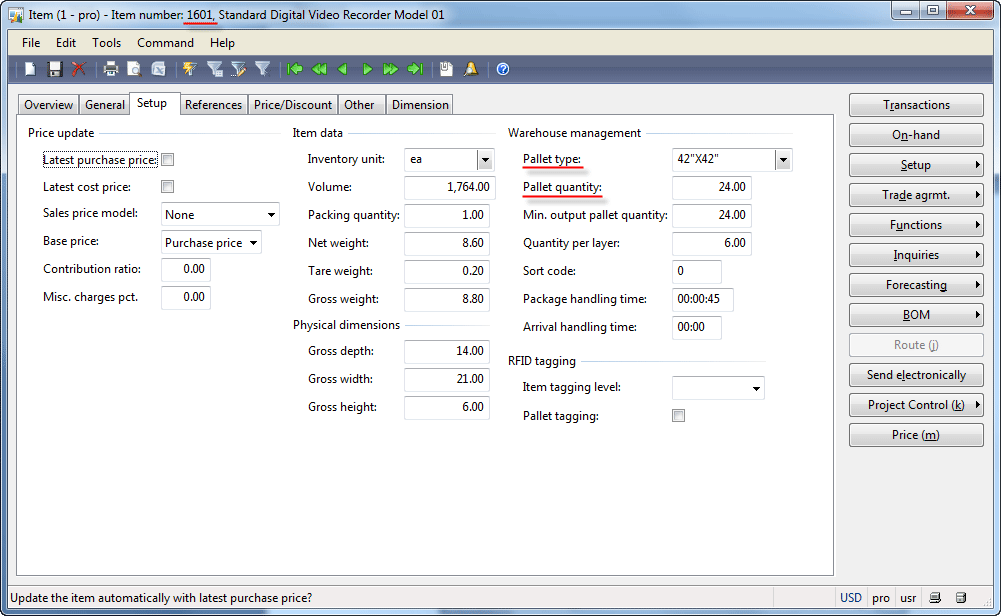 Item form, Setup tab
And, the last two settings that item 1601 must have are a Store zone and a Picking location. A store zone is used to define locations for storing items during the item arrival and registration process, a picking location is used during the shipment process.
- Go to Inventory management > Common Forms > Item details. The Item form opens.
- Find item 1601 and then click the Setup > Warehouse items menu button. The Warehouse items form opens. We will work with warehouse 22; so select the line with warehouse 22 and then go to the Locations tab. Make sure that the Store zone and Picking location fields are populated.
 Warehouse items form
We will go through all steps of Production process later in this training. In the
Trade and Logistics training you can study in detail the
Item arrival and registration and
Shipment processes (how Store zone, Picking location, Pallet type etc. parameters are used).
Creating a Route
A route contains operations that must be executed in order to produce a finished good from components. In the
previous training lesson, we have already discussed in detail how a route can be created and set up. In this training lesson, we will create a simple route with one operation. Let’s reuse operations from the standard demo data. Assume that only the “Enclosure Assembly” operation is required to build the Universal Recorder.
Create a simple route:
- Go to Production > Common Forms > Route details. The Route form opens.
- In the Header area, create a new line with the following value:
- Name = Universal Recorder Route
- Click the Route button. The Route form opens.
- In the header area, create a new line with the following value (set up an operation):
- Operation = Assem_Encl (Enclosure Assembly)
- In the lines area, create a new line with the following values (set up a work center):
- Item code = Table
- Item relation = 0000 (Universal Recorder)
- Site = 2
- Work center = 011
- The Route form will have the following view:
 Route (operations) form
- Close the Route form.
- In the Versions area, create a new line with the following values (assign a BOM item):
- Item number = 0000 (Universal Recorder)
- Site = 2
- In the Versions area, click the Approve button. Select employee 7210, select the Approve route check box in the Approve version form, and then click OK.
- Click the Activation button.
- The Route form will have the following view:
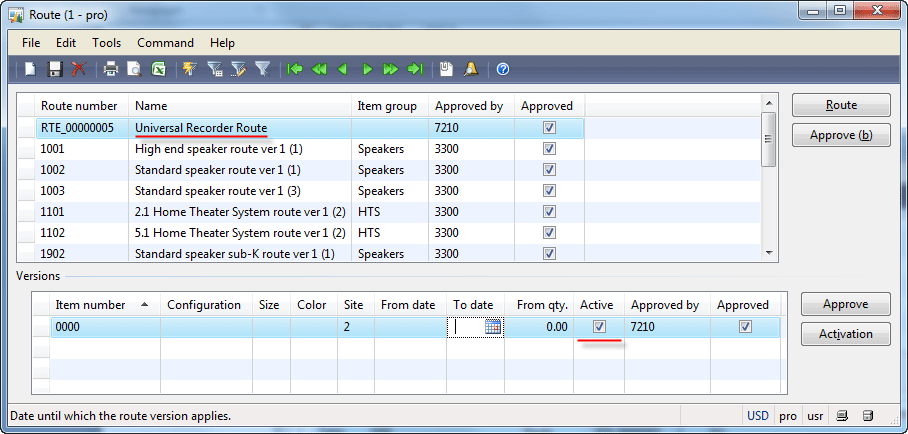 Route form
Let’s analyze the parameters that are required for the job management. In the
Route training lesson, we have studied all route and operation parameters in detail.
Each operation can be divided into jobs. During job scheduling, the following jobs can be created for each operation: Queue before, Setup, Process, Transport, and Queue after. To create jobs, the corresponding job time must be specified. We will specify the time only for the Setup and Process job, so that only these jobs will be created.
- In the Route form, click the Route button. The Route form opens.
- In the lines area, click the Times tab. Specify the following values: Setup time = 2 hours, Run time = 3 hours. The Routeform will have the following view:
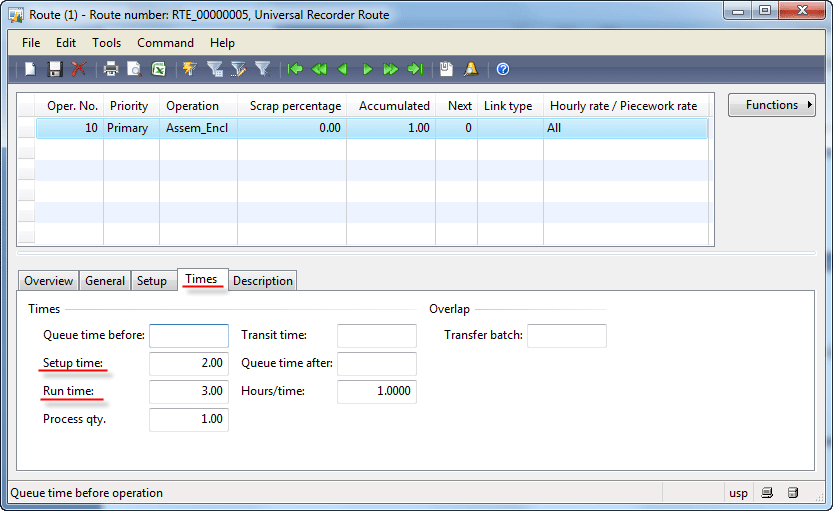 Route form, Times tab
The Route group defines how the operation will be handled in Microsoft Dynamics AX. We can see that the Assem_Encl operation uses route group 10 (see the Figure “Route (operations) form”). Let’s analyze what parameters are set up for route group 10:
- Go to the Production > Setup > Routes > Route groups. The Route group form opens.
- Select route group 10 and then go to the General tab. We can see that all check boxes in the Automatic route consumption group box are selected. In this case, the route consumption step will be executed automatically. Since we are interested in going through all the production steps, this group is not acceptable.
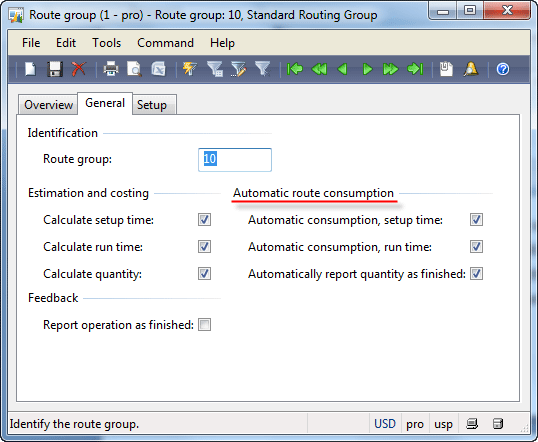 Route group form
- Route group 20 has all mentioned check boxes cleared, so this group is acceptable (make sure yourself).
We need to change the route group from 10 to 20 in the
Route form. Go to
Production >
Common Forms >
Route details > Find the Universal Recorder Route > Click the
Route button > Change
Route group from 10 to 20.
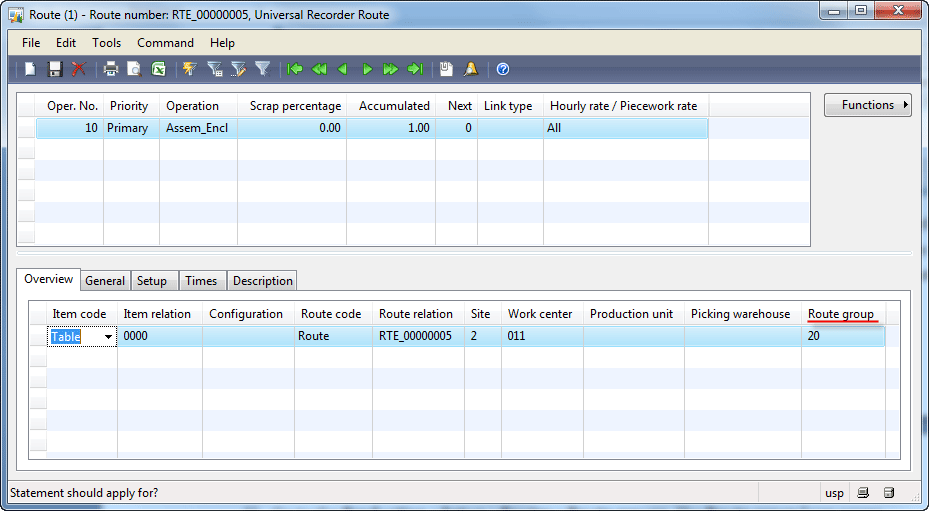
Route form, Route group 20
One more parameter that is required for Warehouse management is work center production location. In the
Work center training lesson we have set up the 01-00-0-0 production input location for the 011 work center (see the “Input location” paragraph and set up production location if you omit this step).
Purchasing BOM Components
We have already set up all parameters that are required for the production process lifecycle with the warehouse and job management. But, before starting the production of a BOM item, we must have all BOM components in the warehouse (i.e. on-hand). In this topic, we will purchase the BOM components – items 1601 and 1602.
…
 You are not authorized to see the full training lesson (38 pages are hidden).
Download the full PDF version of the Production training for Dynamics AX 2009.
…
Summary
In this training lesson, we have gone through the Production lifecycle with the warehouse and job management.
The main steps of the production lifecycle are:
- Creating a production order.
- Estimation. The cost price is calculated.
- Scheduling. The start and end date and time is scheduled.
- Release the production order. Pick component items and deliver to a work center.
- Start the production order. Post time and components quantity consumed during executing jobs: manually, automatically, in the Shop Floor Control module.
- Report as finished. Produced items become available in the warehouse.
- End the production order. Financial update. Transfer cost from Shop Floor Control.
Technorati Tags:
Production end,
Production report as finished,
Production scheduling,
Production start,
Productione estimation
Источник:
http://www.dynamicsaxtraining.com/pr...ion-life-cycle

 Item form
 Route form, Route group 20